Friday, 25 March 2016

Addiction


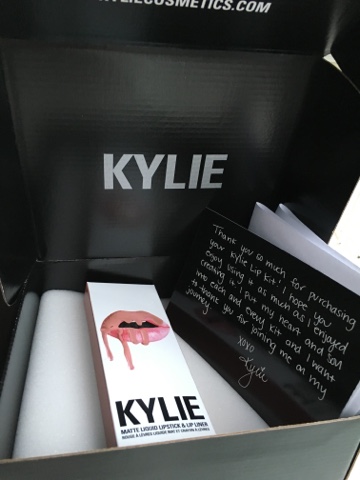
I think I have a problem.  I had to get Kylie Jenner lip kits like my life depended on it. 

So badly, that one day in February I had a look on eBay to see how much they were going for; £50, £60!  I then started bidding on some that were starting at £25.  This wasn't too bad until they started going up and over £40.  I lost a fair few and then all of a sudden I won Mary Jo K!  This isn't exactly my first choice and I'm not sure if I will sell it on so haven't used it at the moment.  This was my first time bidding on anything and I was not very good, I tried bidding odd pence but ended up with whole pounds.  I then got into bidding frenzies and raised my maximum bid so I won Posie K and Candy K!  I knew that the sellers didn't have delivery of the kits yet so I contacted them and paid once they had them.  I really do not condone this method of purchase as I hadn't initially thought they could be fake products that could cause me harm or if I got conned.  I have also paid over the odds, not quite £50 each though.  Luckily I haven't had any problems.  Kylie's website has now been improved so much that it is simple to buy from it when she releases a batch, it's just a case of being I the right place at the right time.

I waited patiently for each lip kit to arrive and excitedly tried them out.  At first I wasn't sure as Posie K came out pretty dark on my lips, I think this is because my lips are very pink anyway and every time I apply the lip kits I feel like they look a little different depend on lighting and base.  You get more true colour if you use the liner underneath to fill in your whole lips.  I think I will also try the kits with concealer underneath to block out my natural lip colour.  The pigment of both the lip liner and the liquid lipstick is amazing.  The liquid dries quickly and rarely transfers but the liner is amazingly soft, gliding on smoothly.

Candy K is also darker than I thought it would be but it is a perfect nude on me and lasts all day.  Part way through the day my lips did feel quite dry so as I read somewhere that Kylie recommends re hydrating your lips so I put some clear lip balm on top which works a treat.


I love looking at pictures of people wearing the different lip colours as they look unique in everyone.  This is where I stumbled across the following blog; http://www.mollysmind.org/lipkit-love.html where they explain what date and times worldwide that the kits will be restocked.  I saw that the 6th restock was coming up on 12th March so I thought I'd set an alarm and go on the website and see how quickly they sell out, (this time it was 30 minutes) but I suddenly wanted Koko K.  I put this in my basket and went to checkout, it did take a few minutes to load but I was able to calmly enter my details and I just got it delivered the other day!  I love this colour the most although it did stain my lips darker than the original colour.


In conclusion I have a love hate relationship with Kylie's lip kits but so glad I have them as they are good liquid lipsticks and liners. 

The next restock is on Monday 28th March, good luck.  Check out the times here; http://www.mollysmind.org/lipkit-love.htm

Monday, 8 February 2016

Life Updates

So the Mini Make Up Tips Monday series is over but I will be delivering more tips along the way.  I thought I would just give you a quick life update.  I am concentrating really hard on my job as I have an exam relating to it next month and I really want to pass!  Last time I did a similar exam I was 2 marks away from passing then couldn't retake.

On the beauty side of things I'm still loving highlighting my cheekbones, brow bone, nose and cuspids bow.  I feel light it sculpts and transforms my face along with carefully placed bronzer.  I am really annoyed with my Anastasia Bevelery Hills Brow Wiz as the brow brush/spoole has snapped off and they want nothing to do with it as I didn't buy it online!  I only use it at weekends and usually keep it in the box, I have now had to cello tape it together so it looks horrid.  Still love the working end though, it's great as it never needs sharpening.


Monday, 1 February 2016

Mini Make Up Tips Monday; The Finishing Touches

So once you have done your base and eyes you need to finish off your make up look.  I usually use a whole range of products to take my make up to the next level.  My top tips include;


  1. Bronzer in a Matt neutral toned shade a few shades darker than your natural skin tone.  This should be swept around the hairline, temples, under the cheekbones, either side of your nose and under your jawline.  This will bring a healthy glow to your complexion and create chiseled features.  But remember to blend well otherwise it you could look like you have a dirty face.
  2. Blusher is something I don't use often but love to switch up my look with.  Just gently sweep your favourite shade on the apple's of your cheeks whilst smiling, this can be shimmery to bring a glow to your cheeks or just a bright pop of colour that say compliments your lipstick.
  3. Highlighter is by far my favourite finishing product as I love to add glitter to my cheekbones, grow bones, bridge of my nose and Cupid's bow.  I fell like this is the thing that makes me really glow and look skinnier in the face.
  4. Most of the time I want my make to last all day so I use a setting spray to set my make up as I don't usually re apply throughout the day.  I just use the MUA one from Superdrug that costs about £5 but worth it.

Monday, 25 January 2016

Mini Make Up Tips Monday; Lips

Lips are sometimes the first thing people see especially if you have red lipstick on.  There are also loads of different options to choose from, like gloss, satin or Matt finishes and any colour.  So here's when to use those options;


  1. To make your lips look fuller use a lip liner, similar coloured lipstick and lip gloss in the centre of your lips.  And just like Kylie Jenner, nude shades work best for plumping.
  2. Nude shades work best when you have a bold smokey eye or bold eye look.
  3. Bright shades light purple, red and hot pink work best if you have a lighter eye make up perhaps with fluttery eyelashes.
  4. Lip balms under your lipstick can make it last longer but also could make your lipstick glossier.
  5. Liquid lipsticks are all the rage right now and usually comes out Matt but still very moisturising as it doesn't fully dry.  These are best if you want a Matt look but get dry lips.
  6. Lip glosses are also really moisturising and can add a touch of colour without being too solid.


Monday, 18 January 2016

Mini Make up Tips Monday; Lashes

Now lashes are where the drama are at and they can transform your look.  My top tips for getting those big full long lashes are as follows;


  1. First up with your bare lashes is curling them with an eyelash curler.  Clamp your lashes and pump the clamp a few times and you can also heat metal ones with a hairdryer to make the curl last longer
  2. Mascara is important to use but the type doesn't really matter as there are so many out there that claim different properties.  It's the way you apply it that's the most effective, I often brush the wand down to coat the top of my lashes and then wiggle the wand from the base of your lashes to the tip and pull the outer lashes up and out.
  3. A good way to not get the mascara all over the place is to tilt your head back and look down into a hand held mirror.
  4. The final wow factor is flash lashes and these can look natural or super fake.  Individual lashes are the best for the most natural look which is build able and then feathery strip lashes also look nice.  Thicker ones look better with a heavier look or with a costume where they don't look odd.
  5. A top tip with fake eyelashes is to put extra glue on the ends of the strip to keep the grip where they often spring off.
  6. An alternative option to false lashes is Fiber lash mascara where you mascara on small fibres onto the lashes that can look as good as fake lashes.


Monday, 11 January 2016

Mini Make Up Tips Monday; Eyeliner

You can do so much with eyeliner and make your eyes look different.  I have a signature flick which I have done since I was 14 and I don't look right without it.  Follow my tips to make the most out of your eyeliner;

  1. Let's start with basic black eyeliner this can be put on your lash line to thicken it, on your tight line (upper waterline) and on your waterline to intensify your eyes.  But be careful as too much black can make your eyes look smaller.
  2. To make your eyes look bigger use a white or pale pink eyeliner in your waterline to widen your eyes.
  3. Some liquid eyeliners can look shiny or flake off, to solve this you have 2 options, 1 is to put a kohl black eyeliner or felt liner underneath or pat Matt black eyeshadow on top to mattify.
  4. In order to do my 60s flick I first line my lash line and then use the edge of my eyebrows to guide my flick and try and make it even each side this way.
  5. I also like to use a brown or gold (instead of black) eyeliner on my lower lash line to keep my eyes widened.
  6. When using coloured eyeliner try to stay away from pinks, reds and purples right next to your eye as they can make you look tired so if you want to use these colours, add black eyeliner to your lash line to break up the colour.

P.S to get glowing rings in your eyes use a ring light or this Boots No7 illuminated mirror that I got in the Christmas sales; http://www.boots.com/en/No7-Illuminated-Makeup-Mirror-Exclusive-to-Boots_1527178/

Monday, 4 January 2016

Mini Make up Tip Monday; Eyeshadow

Your eyelids are where you can really express yourself and go crazy with colour.  Weather you wear your favourite colour or just neutrals, you can make your eyes look amazing.  My top tips for your eyeshadow are as follows;

  1. For longevity and minimal creasing, always use a eyeshadow primer or a long wear eye cream/stick like the Maybelline 24 hour colour tattoo.
  2. Always use different shades to define your eyes.
  3. Stick to a maximum of 3 different colours
  4. The best way to open your eyes up is to use a pale eyeshadow in the inner corners and the darkest shade on at the outer corners.
  5. BLEND!  Whatever colour or type of eye product you use definitely blend and build up the coverage to give the best finish.  This can be done with your fingers, an eye spatulas or eyeshadow brushes.
  6. Matt verses Shimmer; Matt shadows can be used all over the lid or in the crease if using a shimmer shadow in the centre of the lid.